# Custom Improvements

### ➡️Add New Detection Mode <a href="#fries-library-or-input-or-key" id="fries-library-or-input-or-key"></a>

If you want to create your custom detection mode, you are in the right place.

1. Go to **Project Settings**

<figure><img src="https://703575886-files.gitbook.io/~/files/v0/b/gitbook-x-prod.appspot.com/o/spaces%2FEvVA0wYmDo53UvoVgelW%2Fuploads%2FAnb32f4gX5KUu7FZq9eS%2Fimage.png?alt=media&#x26;token=401e7df7-b9be-4a83-8eb1-a3c2eac9ae3e" alt=""><figcaption></figcaption></figure>

2. Find **Gameplay Tags** tab and click on **Manage Gameplay Tags...**<br>

<figure><img src="https://703575886-files.gitbook.io/~/files/v0/b/gitbook-x-prod.appspot.com/o/spaces%2FEvVA0wYmDo53UvoVgelW%2Fuploads%2FtXG3XPRg4bfr8MAGtoRL%2Fimage.png?alt=media&#x26;token=5eee53d7-02e9-46a6-bdbd-ad9d6c7d2238" alt=""><figcaption></figcaption></figure>

3. Add as many custom modes as you want using different tags

<figure><img src="https://703575886-files.gitbook.io/~/files/v0/b/gitbook-x-prod.appspot.com/o/spaces%2FEvVA0wYmDo53UvoVgelW%2Fuploads%2F9XLcSYihyqckTZwNBr4M%2Fimage.png?alt=media&#x26;token=85e6e481-999c-4851-995c-c668e5bd3e1c" alt=""><figcaption></figcaption></figure>

4. Create a new **Actor Component**, based on ***Interactor*** Component

<div align="left"><figure><img src="https://703575886-files.gitbook.io/~/files/v0/b/gitbook-x-prod.appspot.com/o/spaces%2FEvVA0wYmDo53UvoVgelW%2Fuploads%2FAEMcq2XClOInMnFKjHFU%2Fimage.png?alt=media&#x26;token=6a651890-969c-4c89-a4d6-dc8c9cf9a6e5" alt=""><figcaption></figcaption></figure></div>

5. Change the default ***Trace Type*** to your custom tag on component

<div align="left"><figure><img src="https://703575886-files.gitbook.io/~/files/v0/b/gitbook-x-prod.appspot.com/o/spaces%2FEvVA0wYmDo53UvoVgelW%2Fuploads%2FGmG64i3go2OIdfeHBZGM%2Fimage.png?alt=media&#x26;token=a71e65ad-54e3-457d-8b95-97511337c00e" alt=""><figcaption></figcaption></figure></div>

6. Override ***CustomTrace*** function

<div align="left"><figure><img src="https://703575886-files.gitbook.io/~/files/v0/b/gitbook-x-prod.appspot.com/o/spaces%2FEvVA0wYmDo53UvoVgelW%2Fuploads%2FABpHakL3cOeL9VtckXlJ%2Fimage.png?alt=media&#x26;token=f6e9a6fa-12d1-46bd-87d2-0da4b95b5111" alt=""><figcaption></figcaption></figure></div>

7. Write your custom trace logic and return HitResults (if you only get one HitResult, create an array and wire it)

<div align="left"><figure><img src="https://703575886-files.gitbook.io/~/files/v0/b/gitbook-x-prod.appspot.com/o/spaces%2FEvVA0wYmDo53UvoVgelW%2Fuploads%2FgiAvb1QgBRmHGRxDkmap%2Fimage.png?alt=media&#x26;token=e3f7fd46-ee6d-4542-806e-7724d5c3cae2" alt=""><figcaption></figcaption></figure></div>

### 🖼️Creating your own Interaction Holder Widget <a href="#fries-library-or-input-or-key" id="fries-library-or-input-or-key"></a>

The plugin has a standard Interaction widget, which appears to the player whenever he can interact with the ***Interactable*** that owns the widget, but if you don't like it, or want to create your own, here is the step by step.

1. Create a new child widget of the ***UIS\_BaseInteractionHolder*** class.

<div align="left"><figure><img src="https://703575886-files.gitbook.io/~/files/v0/b/gitbook-x-prod.appspot.com/o/spaces%2FEvVA0wYmDo53UvoVgelW%2Fuploads%2FGKAm3oNp24WrA3pp6FPP%2Fimage.png?alt=media&#x26;token=1edfd69c-494f-4bc4-99c4-b4eb9e13888f" alt=""><figcaption></figcaption></figure></div>

{% hint style="info" %}
You can create a copy of the example widget if you prefer, it's even easier.
{% endhint %}

2. Switch from Fill Screen to Desired mode.

<figure><img src="https://703575886-files.gitbook.io/~/files/v0/b/gitbook-x-prod.appspot.com/o/spaces%2FEvVA0wYmDo53UvoVgelW%2Fuploads%2FXkqkmq6RXYP1nVu2S46a%2Fimage.png?alt=media&#x26;token=323c8715-cf98-4e2b-91dd-bf118a11d97e" alt=""><figcaption></figcaption></figure>

3. Add in sequence: A Size Box, an Overlay, two Texts and a progress bar.

<div align="left"><figure><img src="https://703575886-files.gitbook.io/~/files/v0/b/gitbook-x-prod.appspot.com/o/spaces%2FEvVA0wYmDo53UvoVgelW%2Fuploads%2Faq1FTUvjsHt2IjTpUbBD%2Fimage.png?alt=media&#x26;token=e8b7af9e-1e4f-4643-8d41-aff6c3e9ad9d" alt=""><figcaption><p>
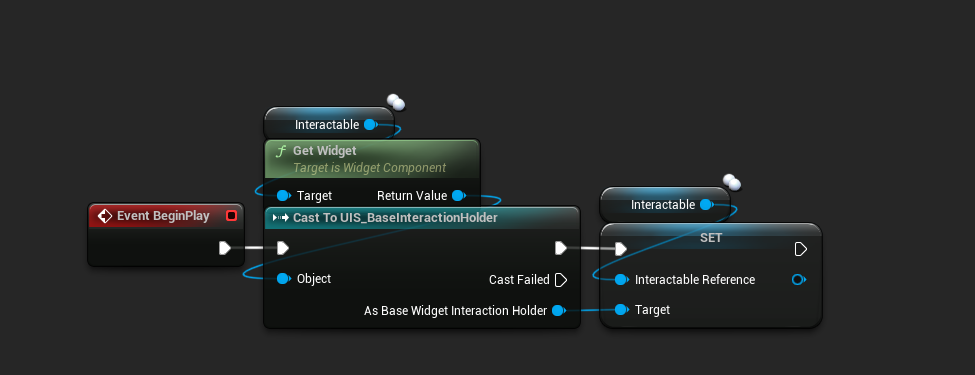
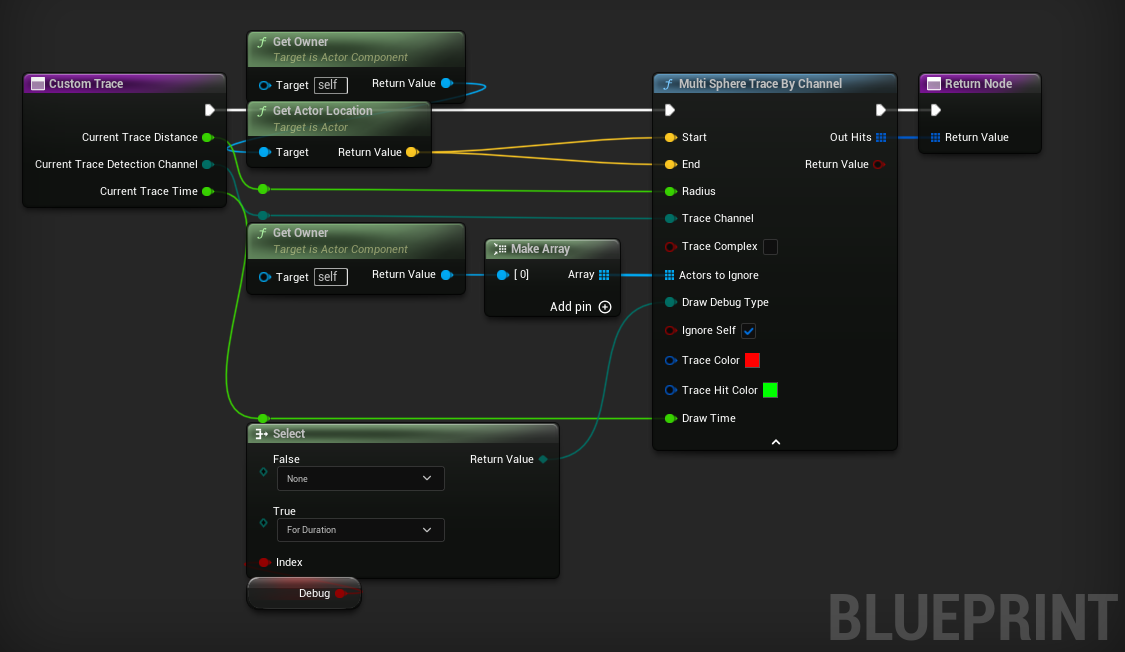
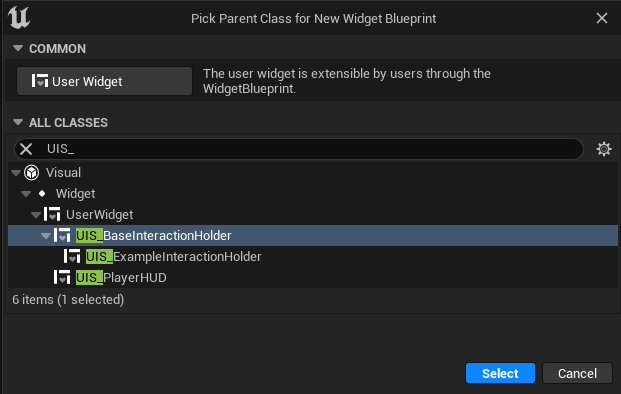
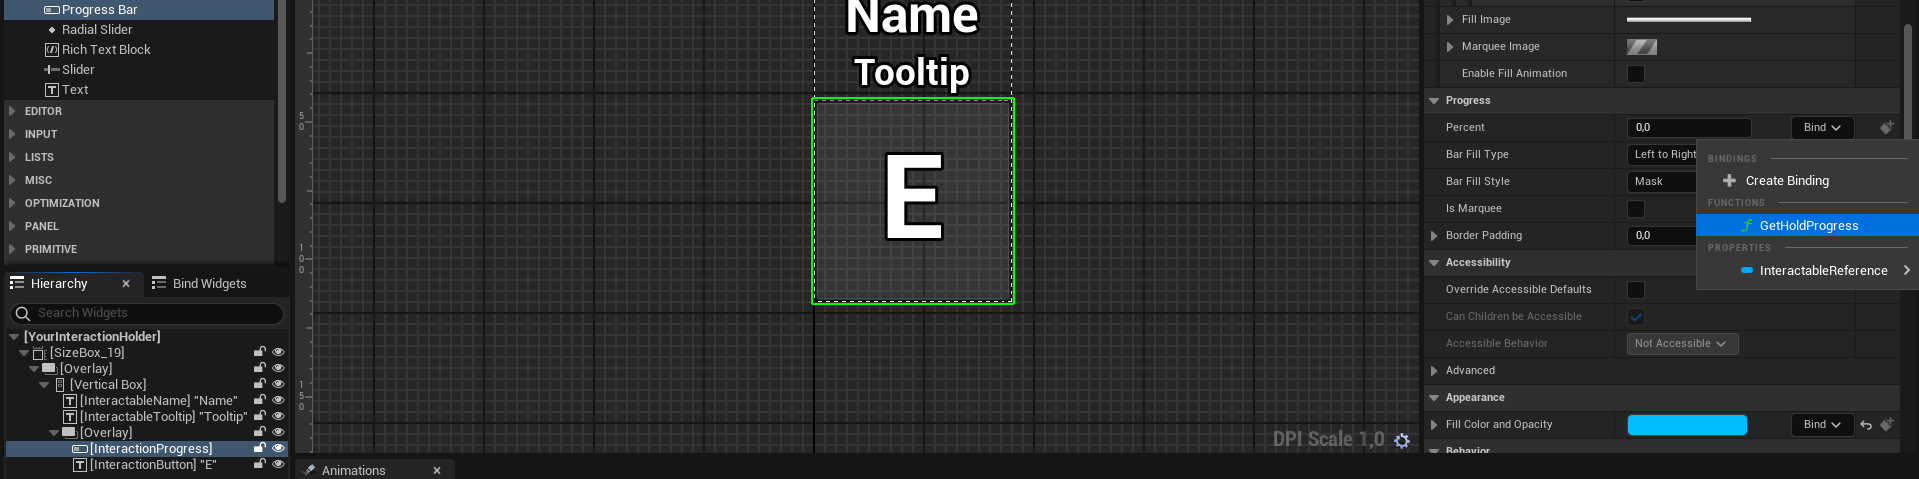
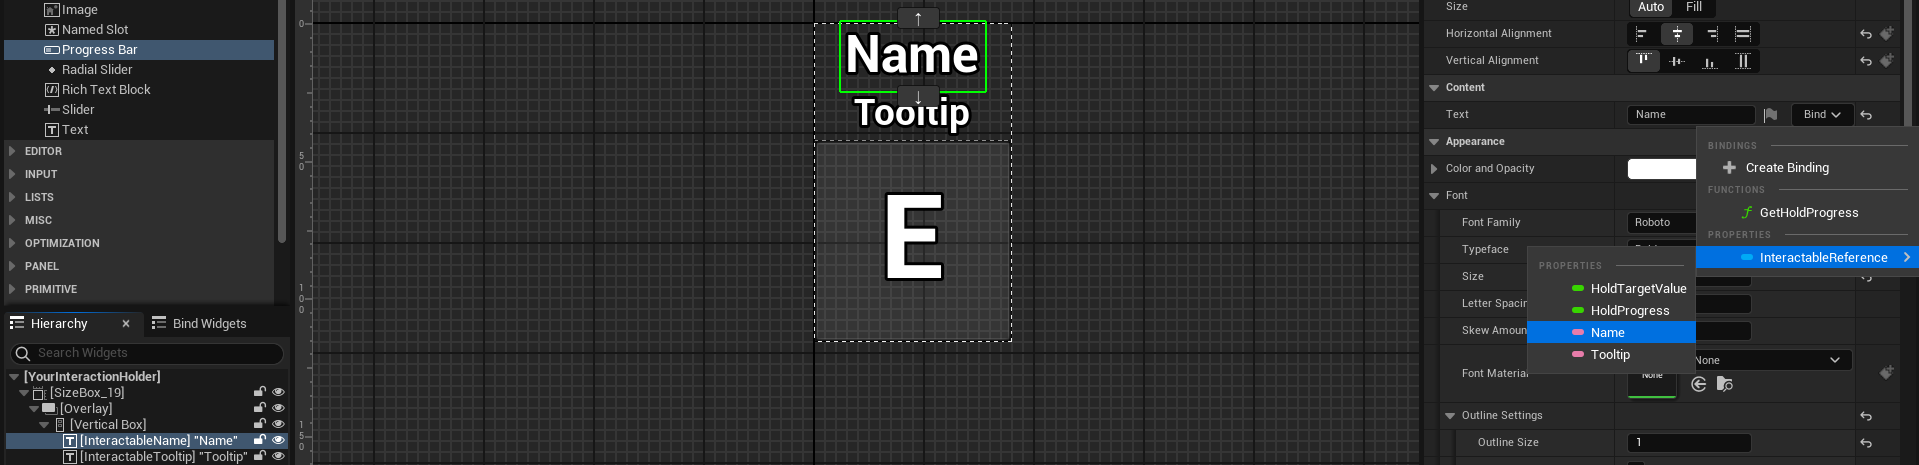
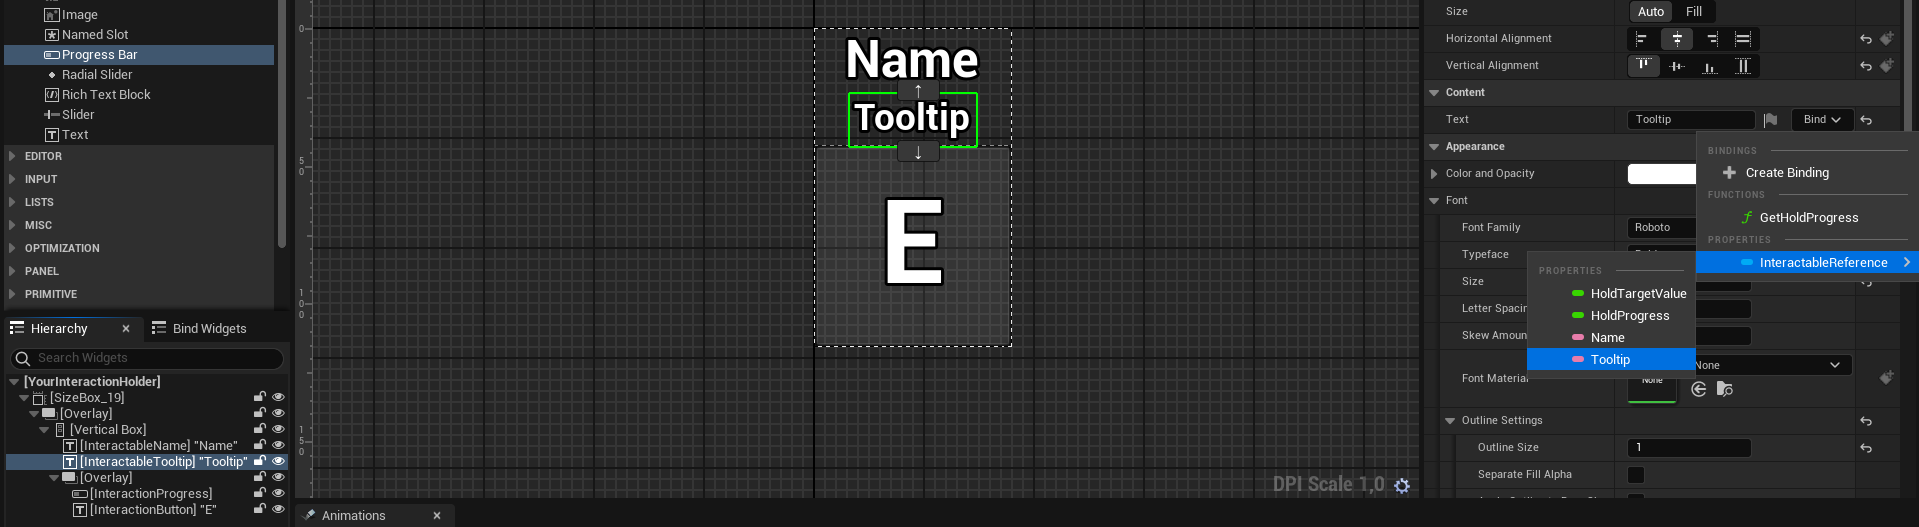
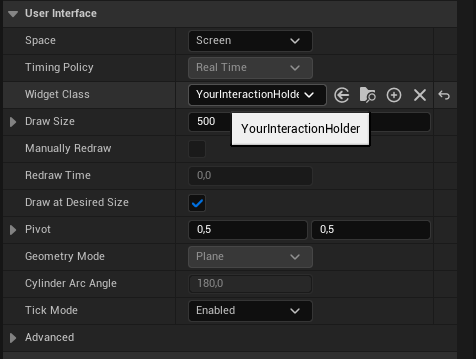
The name of the variables was changed<br> on purpose for educational purposes</p></figcaption></figure></div>

4. In the Size Box Detail tab, change the size (I recommend using 72x116)

<figure><img src="https://703575886-files.gitbook.io/~/files/v0/b/gitbook-x-prod.appspot.com/o/spaces%2FEvVA0wYmDo53UvoVgelW%2Fuploads%2FaDd3W0Jql7khOtiMIYeZ%2Fimage.png?alt=media&#x26;token=0de671a8-ff5c-4b58-be84-833239175271" alt=""><figcaption></figcaption></figure>

5. Now it's your part, configure your design as you see fit.

<figure><img src="https://703575886-files.gitbook.io/~/files/v0/b/gitbook-x-prod.appspot.com/o/spaces%2FEvVA0wYmDo53UvoVgelW%2Fuploads%2F0sPPl5angi6p8Nif0BCA%2Fimage.png?alt=media&#x26;token=a9509760-127a-46f2-95fa-31a1780fe24e" alt=""><figcaption><p>
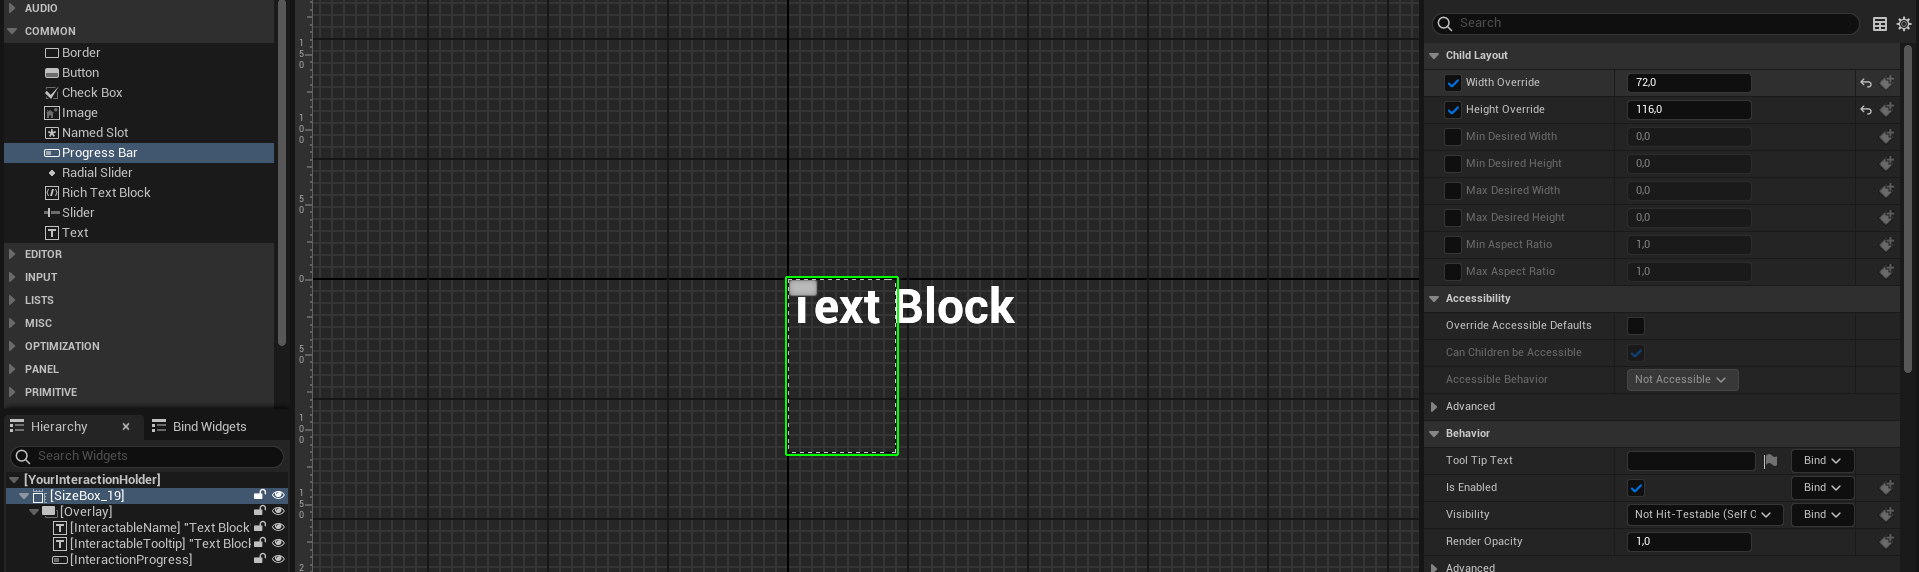
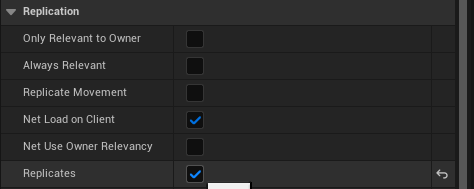
These are my preferences, leave them in whatever style you want.</p></figcaption></figure>

6. Select your progress bar, and bind the "***GetHoldProgress***" function to the "Percent" property.

<figure><img src="https://703575886-files.gitbook.io/~/files/v0/b/gitbook-x-prod.appspot.com/o/spaces%2FEvVA0wYmDo53UvoVgelW%2Fuploads%2FTxAzaew0CMM2w95a6WhW%2Fimage.png?alt=media&#x26;token=1e11b7ac-f826-441e-a5f3-7aa1fe61563c" alt=""><figcaption></figcaption></figure>

7. And also link your text with the Interactable Name.

<figure><img src="https://703575886-files.gitbook.io/~/files/v0/b/gitbook-x-prod.appspot.com/o/spaces%2FEvVA0wYmDo53UvoVgelW%2Fuploads%2FqAJUcYpZkoSSIISwPPBr%2Fimage.png?alt=media&#x26;token=52d50bb8-bb63-4b6d-b8fd-546ee3096de7" alt=""><figcaption></figcaption></figure>

Do the same thing with your Tooltip text

<figure><img src="https://703575886-files.gitbook.io/~/files/v0/b/gitbook-x-prod.appspot.com/o/spaces%2FEvVA0wYmDo53UvoVgelW%2Fuploads%2FRhKZO6GtkU5sVFQGZw3R%2Fimage.png?alt=media&#x26;token=05ce356d-0dc6-4b12-b348-1b48dea555b3" alt=""><figcaption></figcaption></figure>

8. Link the Widget Class of the desired Interactable to the widget you created.

<figure><img src="https://703575886-files.gitbook.io/~/files/v0/b/gitbook-x-prod.appspot.com/o/spaces%2FEvVA0wYmDo53UvoVgelW%2Fuploads%2FpvoRFYUH5X1MvGhTiflg%2Fimage.png?alt=media&#x26;token=90176bfd-67ed-43cb-9f9c-cf2c04bba682" alt=""><figcaption></figcaption></figure>

{% hint style="info" %}
It may be more effective for you to create a base Interaction class derived from ***UIS\_BaseInteractableActor*** (or create an actor with the ***Interactable*** component) and make the necessary changes to this class, it will automatically apply the changes to all child classes. (If in doubt, follow the steps below)
{% endhint %}

### 🔎 Creating your Base Interaction class

1. Create a default actor, and add a static mesh (or skeletal mesh) and a ***UIS\_InteractableComponent*** to him

<div align="left"><figure><img src="https://703575886-files.gitbook.io/~/files/v0/b/gitbook-x-prod.appspot.com/o/spaces%2FEvVA0wYmDo53UvoVgelW%2Fuploads%2Fb8tbMGzWY640Tj3o7MVr%2Fimage.png?alt=media&#x26;token=c11c6efa-1742-4038-b62d-81a2d27cb2dd" alt=""><figcaption><p>
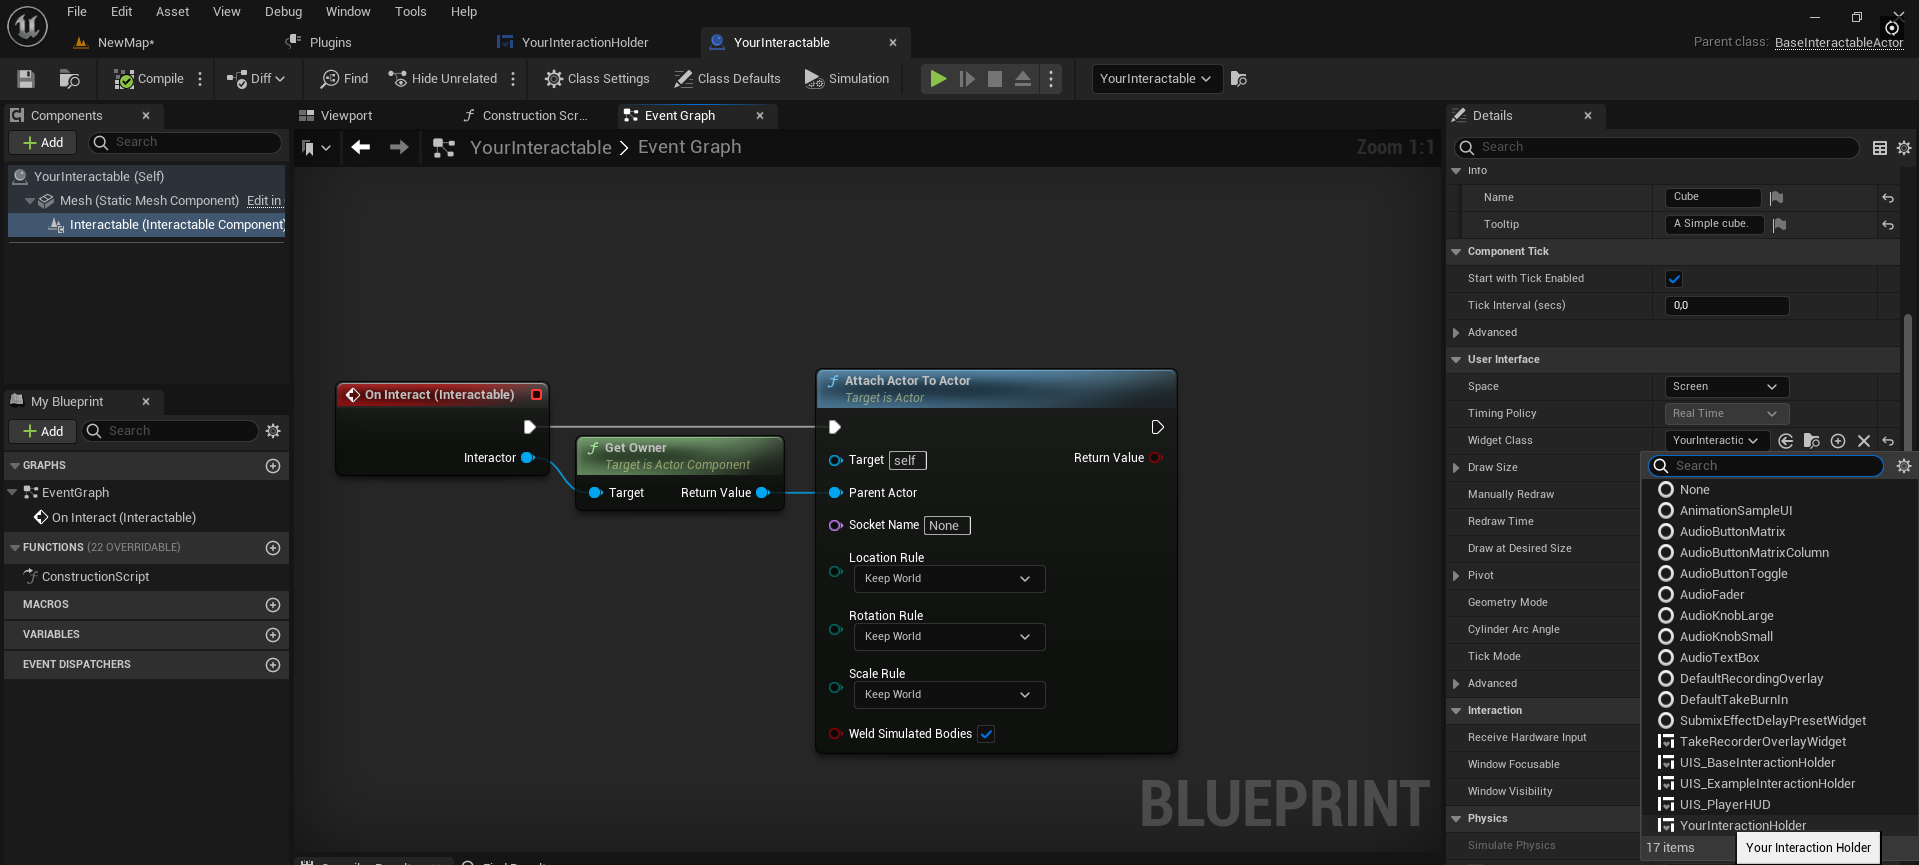
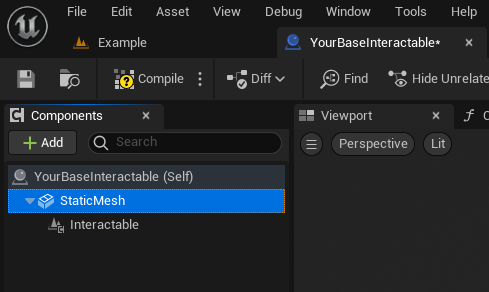
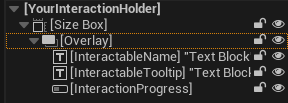
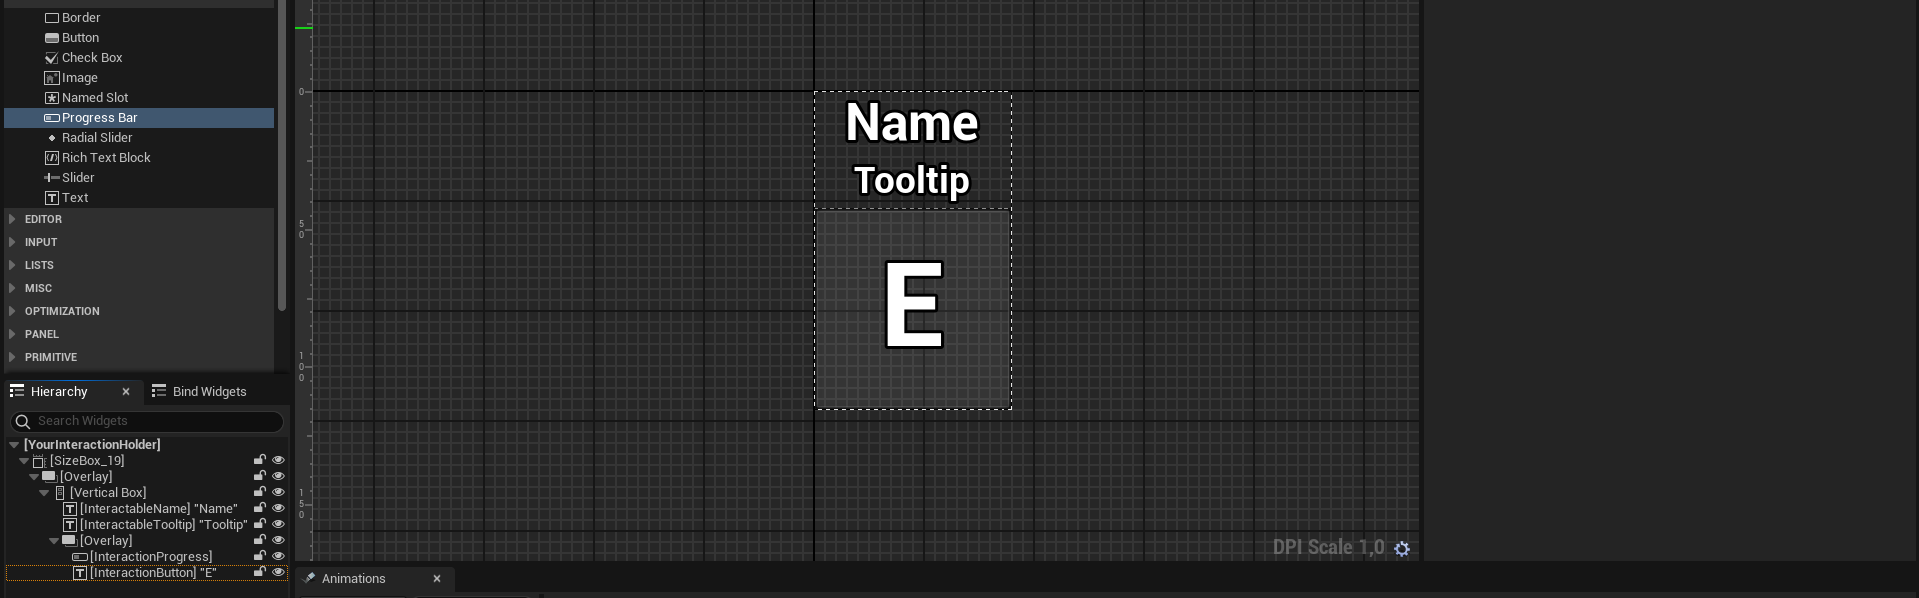
You can add many more components, but this is the basics
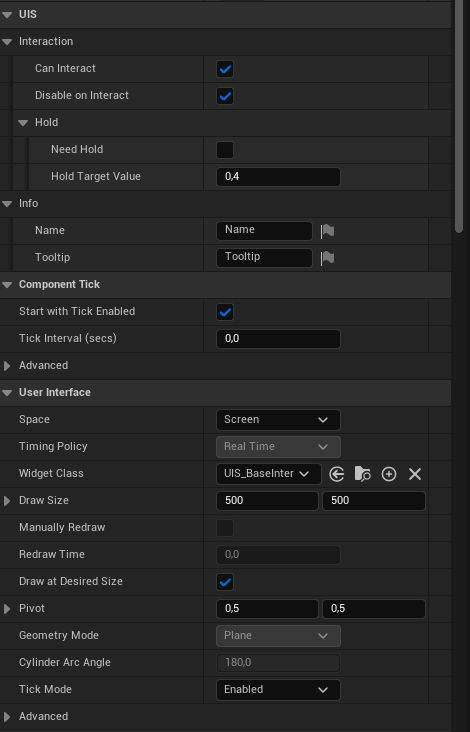
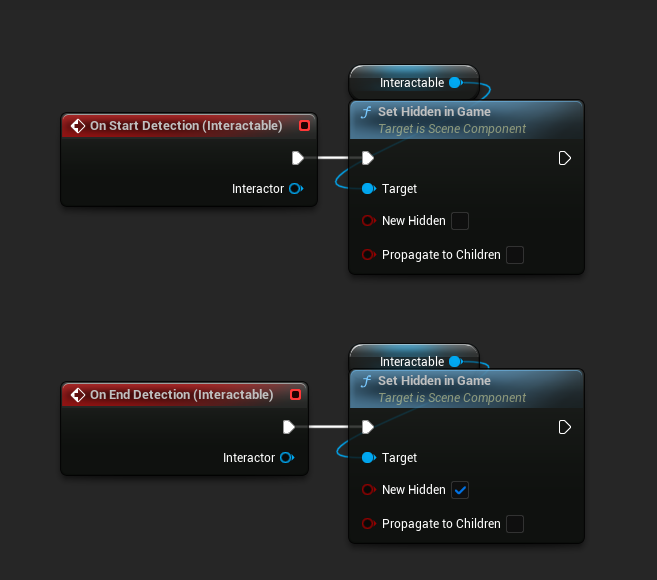
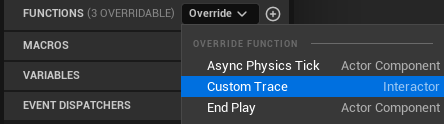
</p></figcaption></figure></div>

2. Now within this actor, you will make all the settings that you want to leave predefined for all interactables created from this one.

<div align="left"><figure><img src="https://703575886-files.gitbook.io/~/files/v0/b/gitbook-x-prod.appspot.com/o/spaces%2FEvVA0wYmDo53UvoVgelW%2Fuploads%2FYx91nWXz6ZpEmRNV5XZI%2Fimage.png?alt=media&#x26;token=ff1ccfd6-6ab7-490d-af11-c5952c573bc3" alt=""><figcaption></figcaption></figure></div>

***

{% hint style="info" %}
Here is a great place for you to define interaction widget that you created, and check actor for replication.
{% endhint %}

<div align="left"><figure><img src="https://703575886-files.gitbook.io/~/files/v0/b/gitbook-x-prod.appspot.com/o/spaces%2FEvVA0wYmDo53UvoVgelW%2Fuploads%2FviurlqBVXInY40ewZtGR%2Fimage.png?alt=media&#x26;token=28fda9fd-76b8-4ba3-823c-3cf1086d12b9" alt=""><figcaption></figcaption></figure></div>

<div align="left"><figure><img src="https://703575886-files.gitbook.io/~/files/v0/b/gitbook-x-prod.appspot.com/o/spaces%2FEvVA0wYmDo53UvoVgelW%2Fuploads%2FayymQxSMbMYP3OtFGFTt%2Fimage.png?alt=media&#x26;token=987b9d38-b1b2-495b-b7a4-e0053cf3406c" alt=""><figcaption></figcaption></figure></div>

***

3. Add these two events, here you MUST create a way to make the ***Interaction Widget*** appear, you can use a timeline, an event call in the widget, or a simple **SetHiddenInGame**.<br>

<div align="left"><figure><img src="https://703575886-files.gitbook.io/~/files/v0/b/gitbook-x-prod.appspot.com/o/spaces%2FEvVA0wYmDo53UvoVgelW%2Fuploads%2FdGik1Z0oBisGE9aiwIjc%2Fimage.png?alt=media&#x26;token=acb0b5c5-19dc-4f1a-a97d-7b57e5789d5f" alt=""><figcaption><p>(Just go to the "Details" tab in the <em><strong>Interactable</strong></em> Component and you will find the events)</p></figcaption></figure></div>

4. Oh, and since we're doing this from 0, we also have to add one simple thing to BeginPlay

<figure><img src="https://703575886-files.gitbook.io/~/files/v0/b/gitbook-x-prod.appspot.com/o/spaces%2FEvVA0wYmDo53UvoVgelW%2Fuploads%2FqCOcXmgcpHMuOMtyVhQO%2Fimage.png?alt=media&#x26;token=10f900b9-c0c8-4716-b31d-fae716f354eb" alt=""><figcaption></figcaption></figure>

{% hint style="info" %}
For optimization purposes, you can use an Interface instead of a Cast To.
{% endhint %}

5. Okay, you've finished the basics of a base interaction class, now you can make any changes you want and create all your interactables from this class.
